Mastering the 36 Yard Zero: Adjusting to 25 Yards for Precision Shooting
Achieving accuracy in shooting requires a solid understanding of zeroing your rifle or pistol. The concept of a “zero” refers to the distance at which your bullet’s trajectory intersects with your line of sight. While a 36 yard zero is sometimes used, shooters often need to adjust this for different distances, such as 25 yards, depending on the specific shooting scenario. This article will delve into the nuances of the 36 yard zero, how to effectively adjust it to a 25 yard zero, and the practical implications for various shooting disciplines.
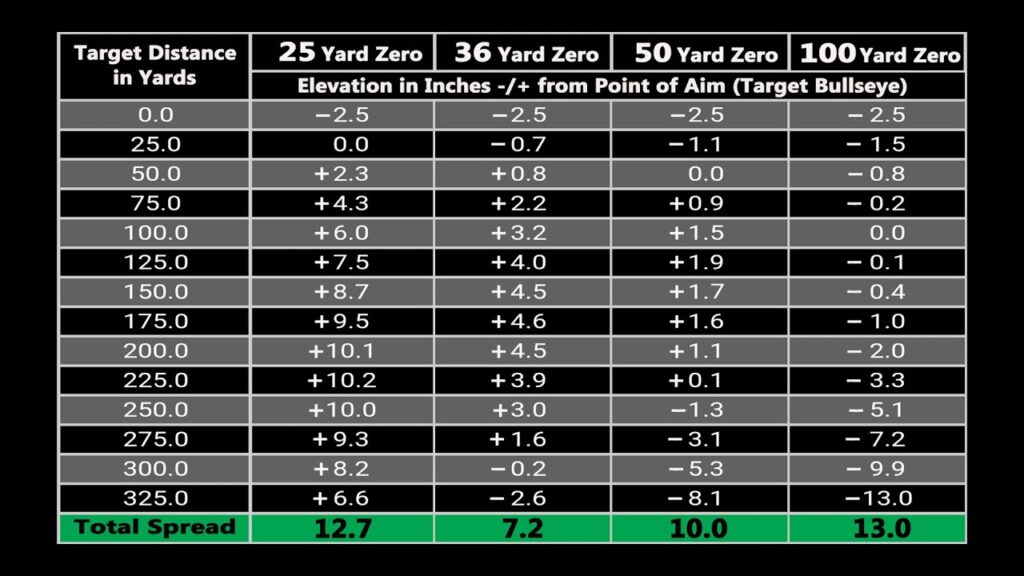
Understanding the 36 Yard Zero
A 36 yard zero means that your bullet will hit the point of aim at 36 yards. This zero is often chosen for specific firearms and ammunition combinations because it provides a relatively flat trajectory within common engagement distances. However, the trajectory of a bullet is not a straight line; it follows a parabolic arc due to gravity. Thus, understanding this arc is crucial for making accurate shots at varying distances.
When setting a 36 yard zero, you are essentially calibrating your sights (or optic) to ensure that the bullet impacts where you intend it to at that specific distance. This calibration process accounts for the height of your sights above the bore of the firearm, the ballistic coefficient of the bullet, and the muzzle velocity of the round. All these factors contribute to the bullet’s trajectory and, therefore, the point of impact at different ranges.
Why Adjust to a 25 Yard Zero?
While a 36 yard zero can be advantageous in certain situations, there are several reasons why a shooter might need to adjust to a 25 yard zero. One common reason is the limitations of the shooting range. Many indoor ranges are limited to 25 yards, making it impractical to zero at 36 yards. Another reason is the intended use of the firearm. For close-quarters combat or self-defense scenarios, a 25 yard zero might be more appropriate because it minimizes the holdover or holdunder required at typical engagement distances. [See also: Understanding Ballistic Trajectory]
Furthermore, a 25 yard zero can simplify aiming for shooters who are less experienced or who prefer a simpler system. By zeroing at 25 yards, the bullet’s trajectory will be relatively close to the line of sight at most practical distances, reducing the need for complex calculations or adjustments.
The Process of Adjusting from 36 Yards to 25 Yards
Adjusting from a 36 yard zero to a 25 yard zero involves understanding the bullet’s trajectory and making the necessary sight adjustments. Here’s a step-by-step guide:
Step 1: Establish a Baseline
First, confirm your current zero at 36 yards. Shoot several groups of three to five rounds at a target placed at 36 yards. Analyze the group’s location relative to your point of aim. This will serve as your baseline for making adjustments.
Step 2: Move to 25 Yards
Next, move your target to 25 yards. Using the same point of aim, shoot another group of rounds. Observe where the rounds are impacting relative to your point of aim.
Step 3: Calculate the Adjustment
Based on the bullet’s trajectory, the point of impact at 25 yards will likely be slightly higher than your point of aim if you were previously zeroed at 36 yards. The exact amount of adjustment needed will depend on the specific firearm, ammunition, and sight height. However, a general rule of thumb is that the point of impact will be approximately 1 to 2 inches high at 25 yards when zeroed at 36 yards. [See also: Long Range Shooting Techniques]
Step 4: Make Sight Adjustments
Adjust your sights (or optic) to compensate for the difference in point of impact. If your rounds are hitting high at 25 yards, you will need to adjust your sights down. The amount of adjustment will depend on the sight’s graduation (e.g., MOA or mils). Consult your sight’s manual for specific instructions on making adjustments.
Step 5: Confirm the New Zero
After making the sight adjustments, shoot another group of rounds at 25 yards to confirm your new zero. If the rounds are now impacting at or very close to your point of aim, you have successfully adjusted your zero. If not, repeat steps 3 and 4 until you achieve the desired accuracy.
Factors Affecting the Adjustment
Several factors can affect the adjustment process, including:
- Ammunition: Different types of ammunition will have different ballistic characteristics, which can affect the bullet’s trajectory.
- Firearm: The specific firearm being used will also affect the adjustment. Factors such as barrel length, twist rate, and sight height can all play a role.
- Environmental Conditions: Wind, temperature, and humidity can all affect the bullet’s trajectory.
- Shooter Error: Consistent shooting technique is essential for accurate zeroing. Any inconsistencies in grip, stance, or trigger pull can affect the point of impact.
Practical Applications
The ability to adjust your zero from 36 yards to 25 yards has several practical applications. For example, law enforcement officers often need to be proficient in shooting at various distances, including close-quarters combat scenarios where a 25 yard zero might be more appropriate. Similarly, competitive shooters may need to adjust their zero depending on the specific course of fire. [See also: Choosing the Right Firearm for Self-Defense]
Furthermore, understanding the relationship between different zero distances can help shooters make more informed decisions about their sight adjustments. By knowing how the bullet’s trajectory changes at different ranges, shooters can compensate for bullet drop or rise and make more accurate shots.
Advanced Considerations
For more advanced shooters, there are several additional considerations to keep in mind when adjusting from a 36 yard zero to a 25 yard zero. These include:
- Ballistic Calculators: Ballistic calculators can be used to predict the bullet’s trajectory at different distances, taking into account factors such as muzzle velocity, ballistic coefficient, and environmental conditions.
- Trajectory Charts: Trajectory charts provide a visual representation of the bullet’s path, allowing shooters to quickly estimate the holdover or holdunder required at different ranges.
- Advanced Sighting Systems: Advanced sighting systems, such as those with bullet drop compensators (BDCs) or illuminated reticles, can simplify the aiming process and improve accuracy at varying distances.
Conclusion
Mastering the 36 yard zero and understanding how to adjust it to a 25 yard zero is essential for achieving accuracy in shooting. By following the steps outlined in this article and considering the various factors that can affect the adjustment process, shooters can confidently calibrate their sights and make accurate shots at a variety of distances. Whether you are a law enforcement officer, a competitive shooter, or simply a recreational enthusiast, understanding the principles of zeroing is crucial for maximizing your shooting potential. The ability to effectively adjust from a 36 yard zero to a 25 yard zero, or vice versa, provides a significant advantage in various shooting scenarios, enhancing both precision and confidence. Remember to always practice safe gun handling techniques and prioritize safety above all else. This understanding of adjusting from a 36 yard zero to a 25 yard zero is critical for any shooter’s skill set. Consistent practice and a solid understanding of ballistics are key to mastering this skill. Adjusting from the 36 yard zero to the 25 yard zero isn’t just about hitting the target; it’s about understanding the science behind it. The principles discussed for adjusting from a 36 yard zero to a 25 yard zero apply to various firearms and shooting disciplines. A solid understanding of adjusting the 36 yard zero to 25 yards is essential for accuracy. This detailed guide on adjusting from a 36 yard zero to a 25 yard zero provides valuable insights for shooters of all levels. Remember, adjusting from 36 yard zero to a 25 yard zero requires attention to detail and consistent practice. Finally, the process of adjusting from a 36 yard zero to a 25 yard zero is a testament to the shooter’s dedication to precision and accuracy. The principles of adjusting from a 36 yard zero to a 25 yard zero are foundational for effective shooting.
