How to Fix a Leaking Sink Kitchen: A Comprehensive Guide
A dripping faucet or a puddle under the sink – these are the telltale signs of a leaking sink kitchen. While seemingly minor, a leaking sink kitchen can lead to wasted water, increased water bills, and even potential water damage to your cabinets and flooring. Addressing the problem promptly is crucial. This comprehensive guide will walk you through the common causes of a leaking sink kitchen, provide step-by-step instructions on how to diagnose and fix the issue, and offer preventive measures to avoid future leaks. We’ll cover everything from identifying the source of the leak to replacing worn-out parts, ensuring you can confidently tackle this common household problem.
Identifying the Source of the Leak
Before you start dismantling your sink, it’s essential to pinpoint the exact location of the leaking sink kitchen. This will save you time and effort by allowing you to focus on the specific component that’s causing the problem. Here’s how to systematically identify the source:
- Check the Faucet: Carefully examine the base of the faucet, the spout, and the handles for any signs of dripping. Pay close attention while the water is running and when it’s turned off.
- Inspect the Drain: Look under the sink and observe the drainpipe, the P-trap (the curved pipe), and the connections to the garbage disposal (if applicable). Run water and check for leaks around these areas.
- Examine the Supply Lines: Trace the hot and cold water supply lines from the shut-off valves to the faucet. Check for any signs of moisture or corrosion along the lines and at the connections.
- Feel for Moisture: If you can’t visually identify the leak, use your hand to feel around the pipes and connections for moisture. Even a small drip can leave a noticeable dampness.
Common Causes of Kitchen Sink Leaks
Once you’ve located the general area of the leaking sink kitchen, you can start to narrow down the specific cause. Here are some of the most common culprits:
- Worn-Out Washers: Washers are small rubber or plastic rings that create a seal between the faucet components. Over time, they can become worn, cracked, or brittle, leading to leaks.
- Loose Connections: The connections between the pipes, faucet, and drain can loosen over time due to vibrations and temperature changes.
- Corroded Pipes: Corrosion can weaken the pipes and create pinhole leaks. This is more common in older homes with galvanized steel pipes.
- Damaged O-Rings: O-rings are similar to washers but are typically used in faucet cartridges. They can also wear out and cause leaks.
- Faulty Cartridge: Single-handle faucets often use a cartridge to control the water flow and temperature. A damaged cartridge can cause leaks around the handle or spout.
- Clogged Drain: A clogged drain can cause water to back up into the sink and leak from the overflow drain or the connections.
- Cracked or Damaged Pipes: Physical damage to the pipes, such as cracks or dents, can obviously cause leaks.
Tools and Materials You’ll Need
Before you start any repairs on your leaking sink kitchen, gather the necessary tools and materials. Having everything on hand will make the job much smoother and prevent unnecessary trips to the hardware store.
- Adjustable Wrench: For tightening and loosening nuts and bolts.
- Basin Wrench: Specifically designed for reaching hard-to-access nuts under the sink.
- Pliers: For gripping and manipulating small parts.
- Screwdrivers (Phillips and Flathead): For removing screws.
- Plumber’s Putty: For sealing connections.
- Teflon Tape: For sealing threaded connections.
- New Washers, O-Rings, or Cartridge: Depending on the cause of the leak.
- Bucket: For catching water.
- Towels: For cleaning up spills.
- Safety Glasses: To protect your eyes.
- Gloves: To protect your hands.
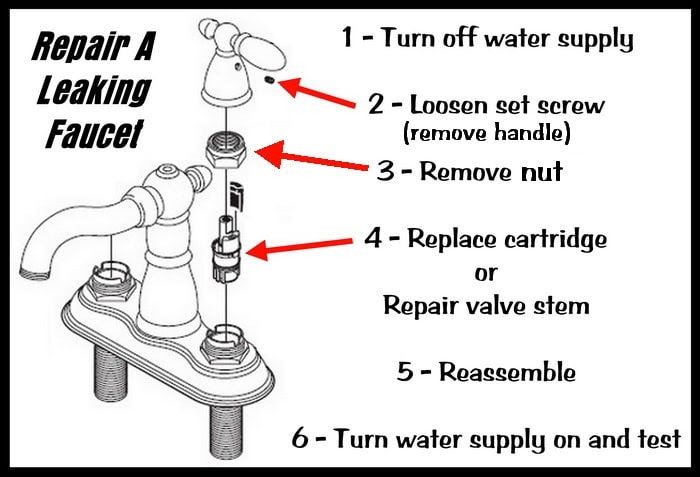
Step-by-Step Repair Guide
Now that you’ve identified the source of the leak and gathered your tools, it’s time to get to work. Here’s a step-by-step guide to fixing some common kitchen sink leaks:
Fixing a Leaky Faucet (Washer Replacement)
- Turn off the Water Supply: Locate the shut-off valves under the sink and turn them clockwise to shut off the water supply to the faucet.
- Plug the Drain: This will prevent any small parts from falling down the drain.
- Disassemble the Faucet: Carefully disassemble the faucet, noting the order of the parts. This may involve removing screws, handles, and decorative caps.
- Remove the Old Washer: Locate the worn-out washer and remove it.
- Install the New Washer: Install the new washer in the same position as the old one.
- Reassemble the Faucet: Reassemble the faucet in the reverse order of disassembly.
- Turn on the Water Supply: Slowly turn the shut-off valves counterclockwise to turn on the water supply.
- Check for Leaks: Check for any leaks around the faucet. If you still see a leak, tighten the connections or try replacing the washer again.
Fixing a Leaky Drainpipe (Tightening Connections)
- Turn off the Water Supply: While not always necessary for drain leaks, it’s a good safety precaution.
- Place a Bucket Under the Leak: To catch any water that may be trapped in the pipes.
- Tighten the Connections: Use an adjustable wrench to tighten the nuts on the drainpipe connections. Be careful not to overtighten, as this can damage the pipes.
- Check for Leaks: Run water and check for leaks around the connections. If the leak persists, you may need to disassemble the drainpipe and apply plumber’s putty or Teflon tape to the connections.
Fixing a Leaky Supply Line (Replacing the Line)
- Turn off the Water Supply: This is essential for supply line repairs.
- Disconnect the Old Supply Line: Use an adjustable wrench to disconnect the old supply line from the shut-off valve and the faucet.
- Install the New Supply Line: Wrap Teflon tape around the threads of the shut-off valve and the faucet connection. Connect the new supply line to the shut-off valve and the faucet, tightening the connections with an adjustable wrench.
- Turn on the Water Supply: Slowly turn the shut-off valves counterclockwise to turn on the water supply.
- Check for Leaks: Check for any leaks around the connections. If you still see a leak, tighten the connections or try reapplying Teflon tape.
Preventive Measures to Avoid Future Leaks
Once you’ve fixed your leaking sink kitchen, you’ll want to take steps to prevent future leaks. Here are some tips:
- Regularly Inspect Your Sink: Check for any signs of leaks or corrosion.
- Tighten Loose Connections: Periodically tighten the nuts on the pipes and faucet connections.
- Replace Worn-Out Parts: Replace worn-out washers, O-rings, and cartridges as needed.
- Avoid Harsh Chemicals: Avoid using harsh chemicals down the drain, as they can corrode the pipes.
- Flush the Drain Regularly: Flush the drain with hot water to prevent clogs.
- Consider a Water Leak Detector: These devices can alert you to leaks before they cause significant damage.
When to Call a Plumber
While many kitchen sink leaks can be fixed with DIY repairs, there are some situations where it’s best to call a professional plumber. These include:
- Extensive Corrosion: If the pipes are heavily corroded, they may need to be replaced, which is a job best left to a professional.
- Complex Plumbing Systems: If you have a complex plumbing system, such as a multi-sink setup or a garbage disposal, it’s best to consult a plumber.
- Persistent Leaks: If you’ve tried to fix the leak yourself and it keeps coming back, it’s time to call a plumber.
- Water Damage: If the leak has caused significant water damage, you’ll need to call a plumber and a water damage restoration company.
A leaking sink kitchen is a common problem, but with the right knowledge and tools, you can often fix it yourself. By following the steps outlined in this guide, you can identify the source of the leak, make the necessary repairs, and prevent future leaks. Remember to always turn off the water supply before starting any repairs and to consult a professional plumber if you’re unsure about anything. Taking proactive steps to maintain your kitchen sink will save you money and prevent costly water damage in the long run. [See also: How to Replace a Kitchen Faucet] [See also: How to Unclog a Kitchen Sink Drain]
